Quickfire Skills
- Ally McEnhill

- Feb 12, 2022
- 4 min read
Updated: May 30, 2022
I think I found this module the most challenging module yet due to the lack of time, however, I think I probably learned the most from it due to that reason.
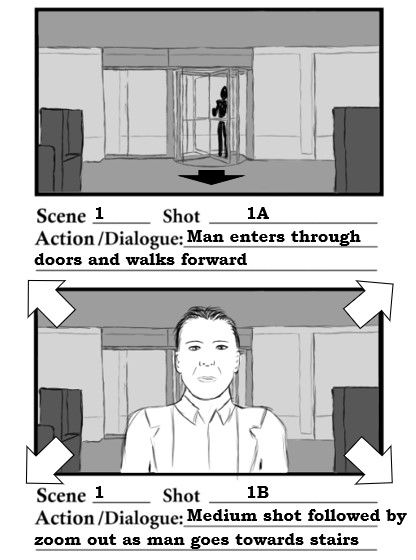
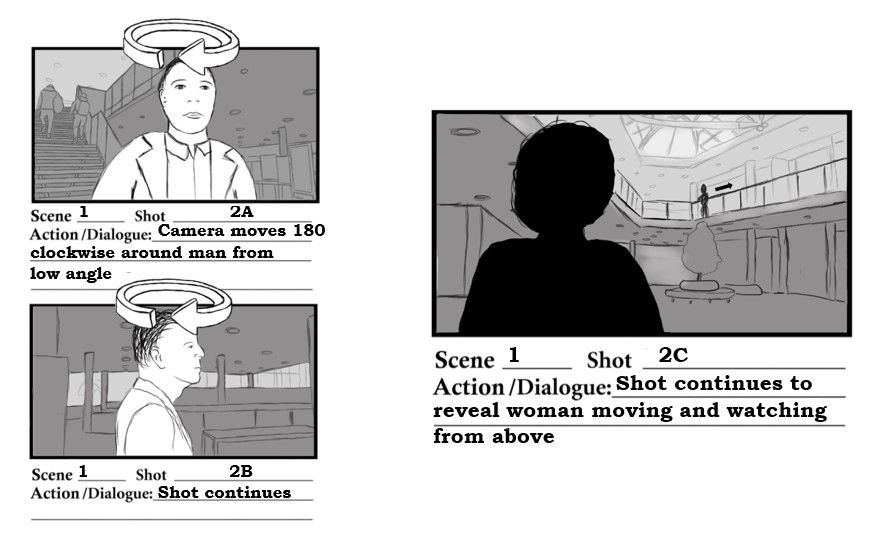
In week one we had to do a storyboard based on an action sequence script we had received based in the business building. Having done storyboarding as my optional module I felt quite confident in the task and its expectations. I first went to the location it was set and took as many photos as I could to use as reference points for my frames. Before then though I had done a rough version planning out what shots I want to achieve. Having done the primary research I then went on to draw the storyboard. I wanted the camera to be stationary at first, to allow for the character to move towards it and establish himself. This also allows his facial expressions to be seen, and the audience sees him look anxiously around the space. This then also allowed me to introduce the space through zoom (mega-zoom). I felt the use of a continuous shot could build tension and as the perspective of the camera is the perspective of the woman observing. It means that both the character and location are established in the same shot. Originally shot 1E was not going to have the silhouette, but after a tutorial, it was decided that the addition of the back of the woman could create a parallel with the shoulder shot used later to identify the woman from below. Having not been near a face for a while, I decided that the next shot need to be another medium shot if the man to show his continued anxiety in the space. I then want the camera to pan around the man from a slightly low-angle perspective to add to the suspense. The shot then later reveals the woman that was revealed earlier in the earlier shoulder shot. Due to time management restraints, I was unable to show the shots whereby the woman withdraws her gun from her bag and misses. I intend to add these shots before the portfolio hand-in.

Week two consisted of our surveying and doing a technical drawing of the arboretum lodge. This was the most challenging task I have ever done. The surveying at first was quite overwhelming but after making it into a team effort rather than an individual endeavor, our efficiency increased dramatically, even though we all got slightly different measurements, it was better than nothing. Then we had to draw up the elevations. This was a lot more time-consuming than I ever thought it could be. And because I did not own a drawing board, it meant the work could only be done in studio time. Fortunately, we got a bit of an extension on this part of the project which helped a lot. Also, halfway through, I realized my layout spacing was completely off and that I needed to rearrange it. Luckily, I was allowed to do this during the clean-up process in photoshop. I found this part of the task most useful as it allowed me to add on notations, and annotations as well as get rid of smudges. Overall, I found this task the most stressful of the 4 but also the most informative as drafting was a skill I had yet to master, and although I would not say I am a master at least I know how to do it now.

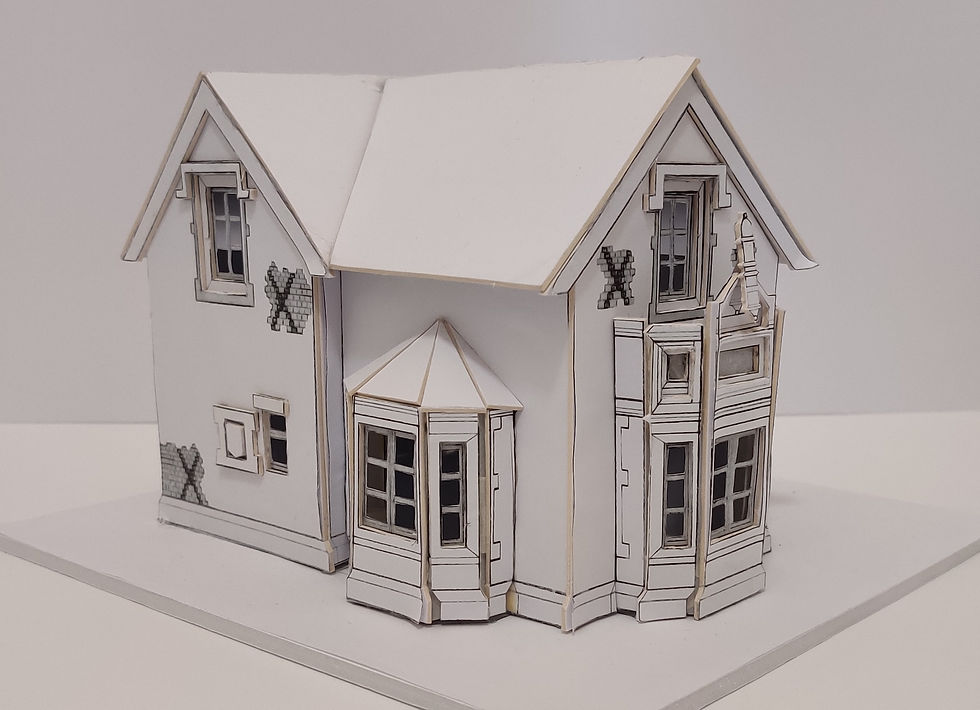
In the third week, we did model making. Unfortunately, I was away due to family circumstances but did manage to complete the task later after the project when I got covid. I found the printing on the elevations relatively easier, however, when constructing the model, it became clear that some of my drawings were not entirely accurate (off by an mm or 2). But I am going to view this as a learning experience and at least I know for next time that this is something I need to watch when hand drafting. I also had some problems with the roof. My roof angling presented gaps between the walls and the roof. I think this was once again due to inaccuracy on roof measurements. If I were to do it again, I would redo the roofs.
In the final week, we focussed on a visual of the lodge we had surveyed, drafted, and created a model of being bombed in WW2. I wanted to set my visual as a morning-after narrative with a child hiding amongst the bushes of the arboretum and the building’s rumble in the background. Having decided my story was attached to the visual, I went back to the arboretum to explore the different angles I could present it. I managed to find the perfect shot and took a low-angle shot from there. But after a tutorial, it was decided that an even lower angle shot was required to add to the drama, so I went back and got more images. As for visual references for the time, I took inspiration from multiple images taken during the blitz and used this to help determine the aesthetic of my visual. When doing the visual, I used a combination of photo bashing and tracing. I wanted to set it in the aftermath, in the morning so that there was morning mist, slowly revealing the damage down in the night. I think if I had had more time I would have added more rubble and branches but I also do not want it to seem overcrowded.
Overall I found quickfire skills stressful yet extremely rewarding and I think it helped me develop my skills but also see the areas where I may need to work a little harder.


Comments